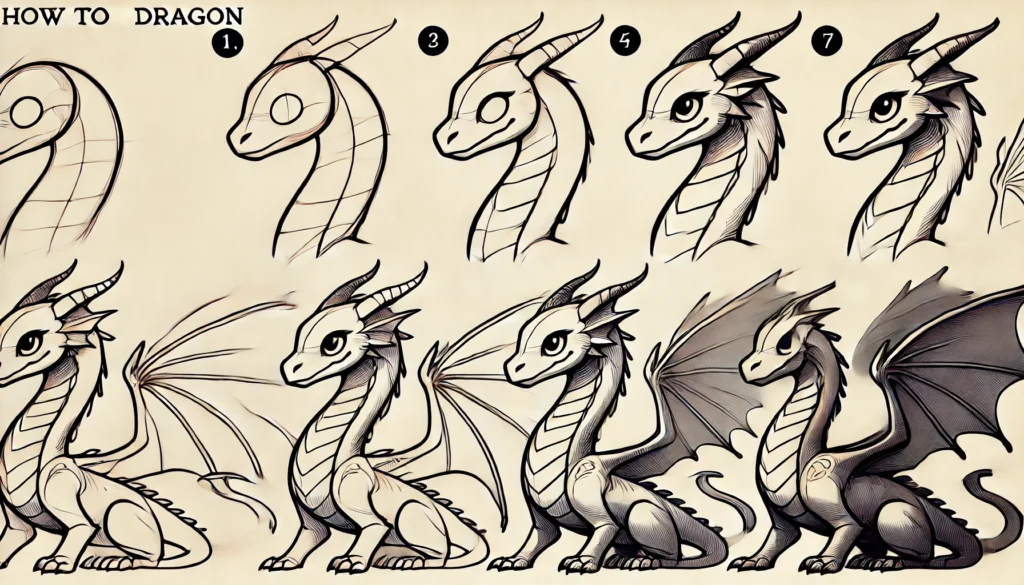
How To Draw a Dragon in 5 Easy Steps – Quick and Simple
Posted on |
Introduction
Dragons have long enchanted the human imagination, embodying mystery, power, and grace. Whether you’re drawn to the legends they inspire or the creative possibilities they offer, learning to draw a dragon opens the door to an exciting artistic journey. With this guide, anyone—from beginners to budding artists—can learn to sketch a dragon in five easy steps. Let’s unleash your inner artist and bring this mythical creature to life on paper.
Gathering Your Materials
Before diving into sketching, gather essential drawing tools. A quality pencil (preferably a range from 2H to 6B for shading variation), a sturdy eraser, and sketch paper are all you need to start. A sketchbook with medium-to-heavyweight paper works well for both pencil and ink, helping to bring out the depth in your dragon’s textures. Optional tools like blending stumps and fine-tipped pens can enhance your final creation, giving it polish and personality.

Step 1: Drawing the Dragon’s Head
Begin with a rough outline of the dragon’s head, using simple shapes to map its contours. Start with a rounded rectangle for the snout and jawline. Add two small circles for the eyes, positioned slightly above and behind the snout. Focus on capturing the intensity of its gaze, which gives the dragon its character. Consider the placement of horns or ears to lend personality, making your dragon look wise, fierce, or gentle.
Step 2: Creating the Body and Torso
From the head, sketch the dragon’s elongated neck, hinting at its strength and flexibility. Outline the chest and torso, ensuring it flows naturally from the neck. Dragons often have muscular limbs—draw these as ovals or cylinders, gradually building up detail. Be mindful of proportions, as the body should balance with the head and wings, giving a sense of cohesive form.
Step 3: Designing the Wings
For the wings, decide on a style that complements your dragon’s personality. Bat-like wings with a skeletal structure can give a fierce appearance, while feathered wings suggest elegance. Draw the bone structure of the wing first—three or four elongated “fingers” that fan out to support the wing membrane. Add texture with light, curved strokes to suggest leathery skin or feathers, bringing a touch of realism.
Step 4: Shaping the Tail
A dragon’s tail can vary widely in length, thickness, and detail. Choose a shape that complements the overall body form, whether it’s a slender, snake-like tail or a robust, muscular one. Adding elements like spikes, fins, or flames can heighten the visual impact, making the tail a focal point. Ensure the tail’s flow harmonizes with the body’s posture to maintain proportion.
Step 5: Adding Details and Texture
To bring depth to your dragon, focus on scales or other textures. Start with small, overlapping shapes, working from the head down toward the body. Shadows add dimension, so shade lightly around the eyes, under the jaw, and along the body’s curves. This contrast will create a lifelike feel, especially if you vary shading intensity to capture light and shadow.
Bringing Your Dragon to Life with Color
Choosing colors for your dragon can be exhilarating—vibrant reds, cool blues, or mystical greens can each transform its character. Use a combination of darker shades to build shadows and lighter hues to highlight. Blend colors to give a smooth, scaled effect, adding depth and creating a three-dimensional appearance.
Common Mistakes and How to Avoid Them
Avoid the temptation to overcrowd details—simplicity can often have a stronger impact. Keep an eye on proportion throughout, ensuring wings, head, and tail complement the torso. Realistic textures depend on consistency, so apply scales, horns, or feathers with a similar technique for a cohesive result.
Finishing Touches for a Polished Look
Once satisfied with your sketch, use a fine pen to ink prominent lines. This step enhances definition, making your dragon pop. Add highlights with a white gel pen or colored pencil to create a glossy finish on the scales, snout, and wings. Take a moment to step back, evaluate, and refine until you’re pleased with the final image.

Creative Variations on Your Dragon
Dragons can be endlessly unique! Try adding distinctive features like a beard, larger horns, or unusual tail ends. You can even mix-and-match wing types, experimenting with feathered, bat-like, or hybrid designs to make your dragon a one-of-a-kind creation.
Going Beyond: Experimenting with Backgrounds
Imagine your dragon soaring over mountains or nestled in a cavern. Adding a background scene can enrich your drawing, giving context and storytelling elements to the piece. Whether a smoky sky, distant castle, or rugged landscape, a background adds depth and transforms the drawing into a complete composition.
Tips for Beginners to Develop Confidence
Beginners may find dragon drawing daunting, but confidence grows with practice. Start with small sketches, focusing on individual parts—eyes, scales, or wings. Celebrate each improvement, knowing progress often comes in small, satisfying steps.
Advanced Techniques to Elevate Your Dragon Art
For those looking to enhance their artwork, digital tools can sharpen details and refine textures. Combining traditional and digital techniques offers the best of both worlds, while experimenting with watercolors or pastels can introduce a fresh vibrancy and unique effect.
Encouragement to Keep Practicing
Every stroke builds skill. Embrace mistakes as learning opportunities and seek feedback from fellow artists. The more dragons you draw, the more unique features you’ll develop. Set goals to explore different dragon species, strengthening your artistic vision and technique.
Conclusion
Completing a dragon drawing is a journey of imagination and skill. Each dragon has its own character, reflecting your creativity and passion. Share your masterpiece with others, letting them see the myth and magic come alive in your art. Let this dragon be the beginning of an artistic adventure that sparks further creativity.

