How To Draw A Bee 5 Easy Steps – Quick and Simple
Posted on |
Introduction How To Draw A Bee
Bees are enchanting little creatures with a charm that captivates both nature lovers and artists. Known for their industrious behavior and intricate role in ecosystems, they make delightful subjects for drawing. Learning to draw a bee in a few easy steps not only hones artistic skills but also brings a whimsical, joyful element to your sketchbook. This guide breaks down the essentials to capture a bee’s likeness with minimal effort and maximum fun.
Materials You’ll Need
Basic Drawing Supplies
Begin with simple supplies: a pencil, eraser, and paper are all you need to start. For those aiming to add vibrant colors, colored pencils or markers will enhance the bee’s bright, cheerful look.
Optional Add-ons for Enhanced Detail
For more depth and texture, consider fine-tip pens for outlining and blending stumps for shading. These tools help create a polished finish, especially if you’re exploring details beyond the basics.

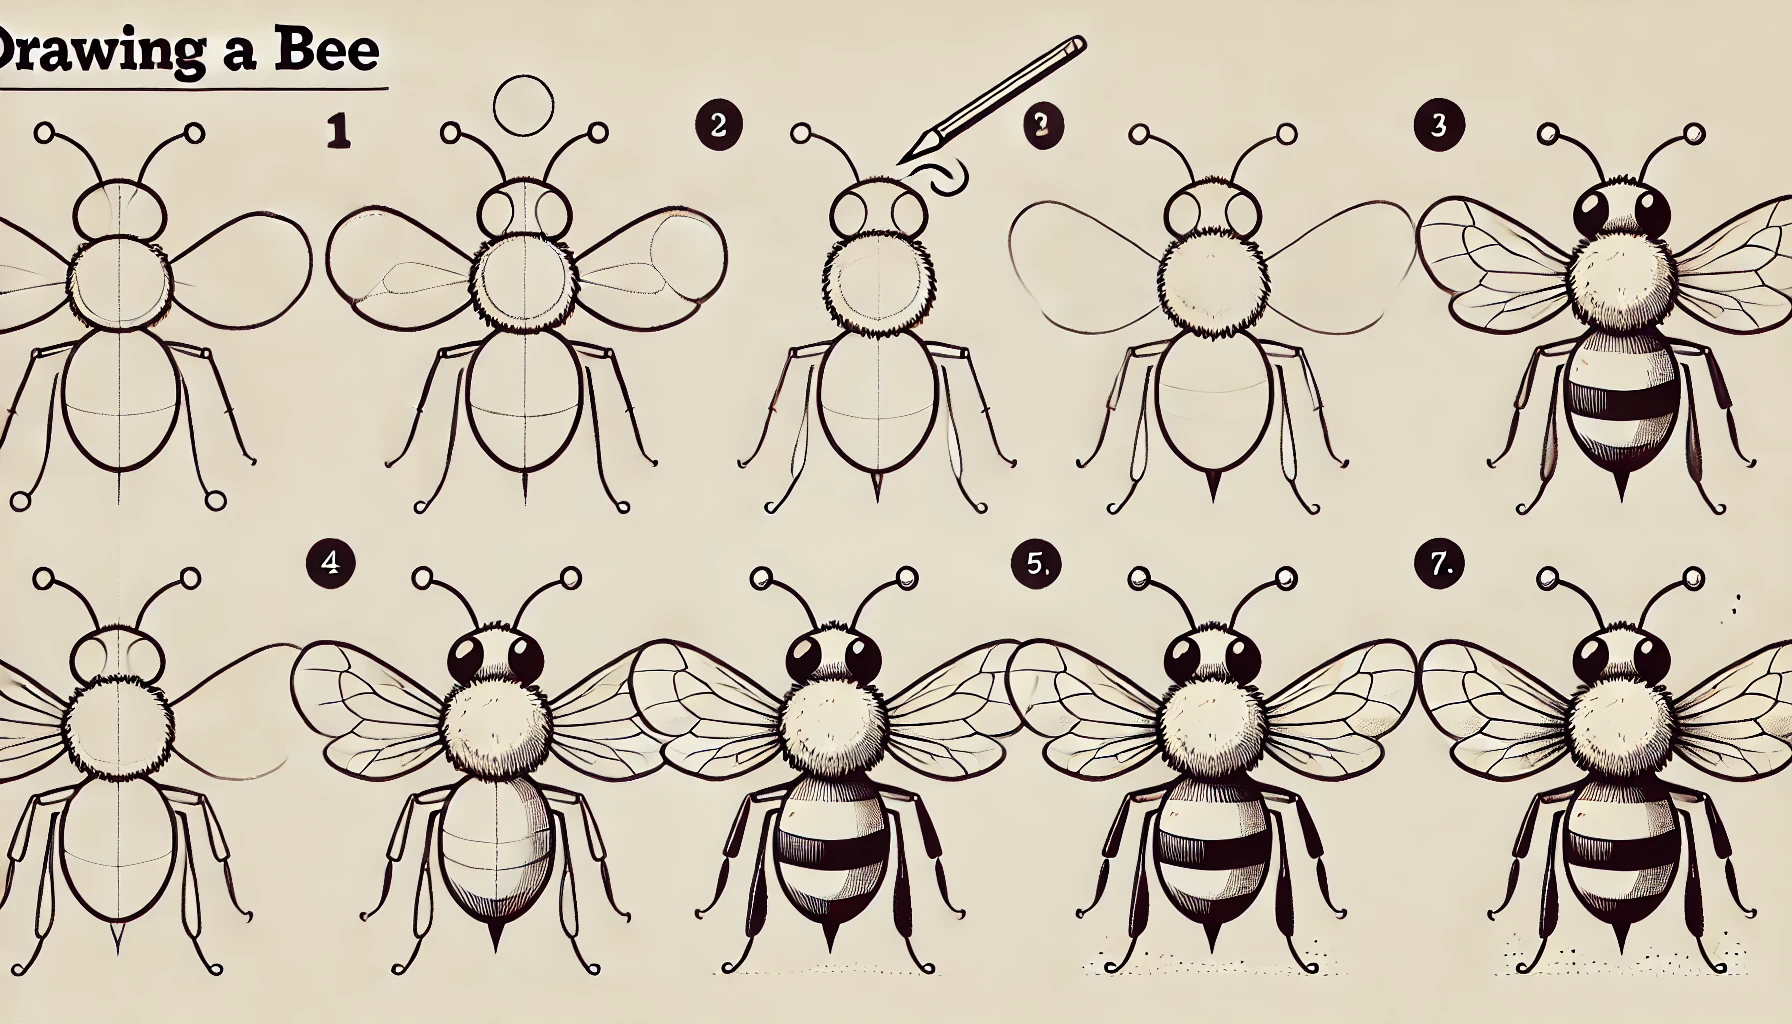
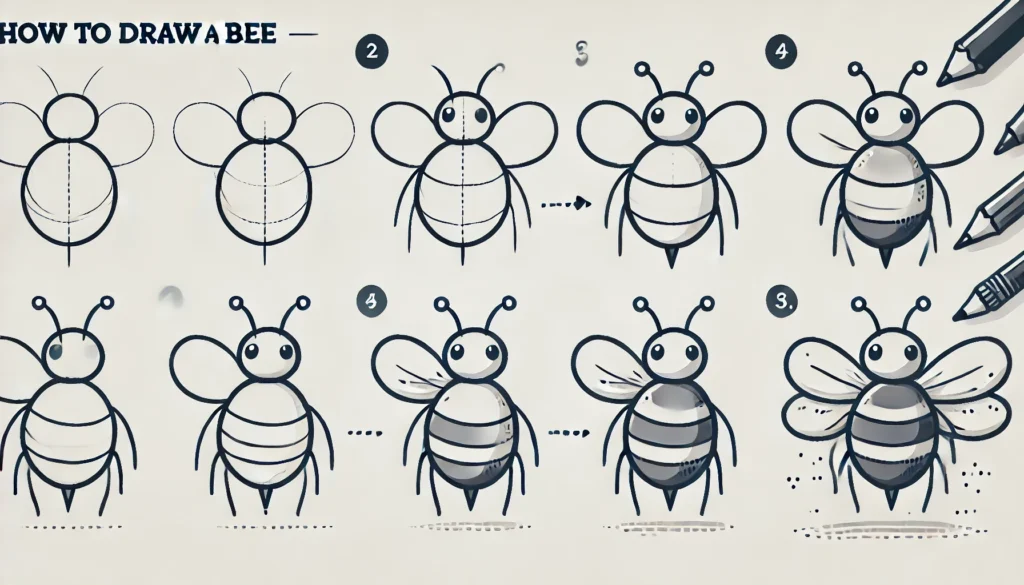
Step 1: Drawing the Body
Starting with a Simple Oval Shape
The body of a bee begins with an oval, elongated horizontally. This basic shape serves as the foundation for the bee’s entire structure, providing a guideline for its size and proportion.
Refining the Bee’s Body Structure
After drawing the oval, refine it slightly, adding gentle curves to suggest the bee’s soft, fuzzy appearance. This subtle tweak creates a sense of roundness that will make the bee feel more lifelike.
Step 2: Adding the Head
Creating a Smaller Circle for the Head
Place a small circle above the oval for the head. Position it slightly to one side to give the bee a charming tilt, as if it’s observing its surroundings.
Positioning the Head Correctly on the Body
Connect the head to the body with a short, curved line. Ensuring the head sits naturally on top of the body gives the drawing a cohesive look.
Step 3: Drawing the Wings
Understanding the Shape of Bee Wings
Bee wings are teardrop-shaped with a rounded edge that attaches to the body. For a quick, simple wing, draw two teardrop shapes extending from the bee’s upper back.
Placing the Wings Symmetrically
Position each wing on either side of the bee’s body for balance. Bees often have slightly transparent wings, so drawing light, thin lines will capture this effect.
Step 4: Adding Legs and Antennae
Drawing Basic Legs with Simple Lines
A bee’s legs are small and easy to add. Draw short lines coming out from the bottom of the body, angling them slightly backward to suggest motion.
Adding the Antennae for Character
Add two delicate lines extending from the bee’s head, each with a small bulb at the tip. These antennae give the bee personality and complete its structure.
Step 5: Creating Stripes and Other Details
Adding the Signature Stripes
Draw a few stripes across the bee’s body, ensuring they’re evenly spaced. These stripes are the bee’s hallmark and bring the whole drawing to life.
Finalizing the Bee with Tiny Details
Add small touches like the bee’s eyes, a gentle smile, and fine lines on the wings to give it a whimsical, friendly look. These details make the bee feel approachable and charming.
Tips for Adding Personality to Your Bee Drawing
Experimenting with Expressions
A slight tilt of the head or a gentle curve on the mouth can transform the bee’s expression, giving it a playful or curious look. Don’t be afraid to get creative with expressions.
Adjusting the Wing Shape for Playfulness
Curving the wings or adding small swoops can make the bee appear in flight, giving your drawing a sense of movement and energy.
Common Mistakes to Avoid
Overcomplicating the Design
A bee is a simple creature; avoid too many lines or intricate details that detract from its soft, friendly look.
Misplacing the Legs and Antennae
Be mindful of where you position the legs and antennae. Legs should be consistent in length, and antennae should be spaced evenly from the head for symmetry.
How to Shade and Add Depth to Your Drawing
Basic Shading Techniques for Beginners
Add light shading along the bottom of the body to give it dimension. Soft, even shading will make the bee appear rounded.
Highlighting Tips to Make the Bee Pop
Using an eraser, create small highlights on the wings and body. This subtle contrast adds a sense of realism to your bee.
Coloring Your Bee
Choosing Vibrant Colors
Yellows and blacks make the bee recognizable and fun. Opt for bold, vibrant shades to bring your bee to life.
Blending Colors for Realistic Effects
Blend the yellow and black stripes slightly where they meet to soften any harsh lines. This blending can create a more realistic, cohesive appearance.
Creating Backgrounds to Enhance Your Bee Drawing
Simple Floral Background Ideas
Flowers add a lovely touch to bee drawings. Simple, small daisies or wildflowers in the background can frame the bee beautifully.
Adding a Honeycomb Pattern
A few hexagons around the bee can suggest a honeycomb, linking the bee to its natural habitat. This detail adds context without overwhelming the drawing.
How to Practice Drawing Bees Regularly
Easy Ways to Practice Daily
Create quick sketches of bees from different angles. These small studies build confidence and make drawing bees feel effortless.
Building Consistency with Mini-Drawings
Try a daily mini-bee drawing challenge. Sketching regularly helps improve muscle memory and hones skills over time.
Advanced Tips for Refining Your Bee
Adding Texture to the Body
A few light, short lines across the body can suggest the bee’s fuzzy texture, enhancing realism.
Perfecting Wing Details
Add tiny veins within the wings for a natural, intricate look. These details give the drawing complexity without overpowering simplicity.
Digital Drawing Tips for Bee Illustrations
Using Drawing Software for Beginners
Digital drawing tools like Procreate and Adobe Fresco offer easy-to-use options for creating bees with clean lines and vibrant colors.
Adding Digital Textures and Effects
Experiment with digital brushes that mimic traditional media for a unique finish. Adding slight blurs or gradients can elevate the bee’s appearance.
Transforming Your Bee Drawing into Art
Framing Your Drawing
Consider framing your bee illustration, turning it into a display-worthy piece for your home or studio.
Creating Greeting Cards and More
Print your bee on greeting cards or postcards. This versatile drawing can add a handmade touch to special notes.
Fun Facts About Bees to Inspire Your Art
Unique Bee Traits
Did you know bees can recognize human faces? Adding quirky details to your bee drawing is a fun way to celebrate their unique personalities.
The Role of Bees in Nature
Bees are crucial pollinators. Remembering their vital role in ecosystems can inspire creativity and add purpose to your art.

Why Drawing Bees is Therapeutic
The Calm of Simple Illustrations
Drawing small, uncomplicated creatures like bees can be a meditative activity, helping you unwind and refocus.
Connecting with Nature through Art
Creating art inspired by nature strengthens our bond with the world around us, offering peace and joy.
Frequently Asked Questions
Can Anyone Learn to Draw Bees?
Yes, absolutely! With practice and patience, anyone can draw a bee in just a few steps.
How Long Does It Take to Perfect?
This quick drawing method means you’ll create a recognizable bee in minutes. Perfecting it comes with time and repetition.
Conclusion
Drawing a bee in five easy steps is a delightful, rewarding experience. From simple shapes to expressive details, your bee drawing will bring cheer to anyone who sees it. Enjoy the process, celebrate your progress, and keep drawing!

